CRNN 간단 소개

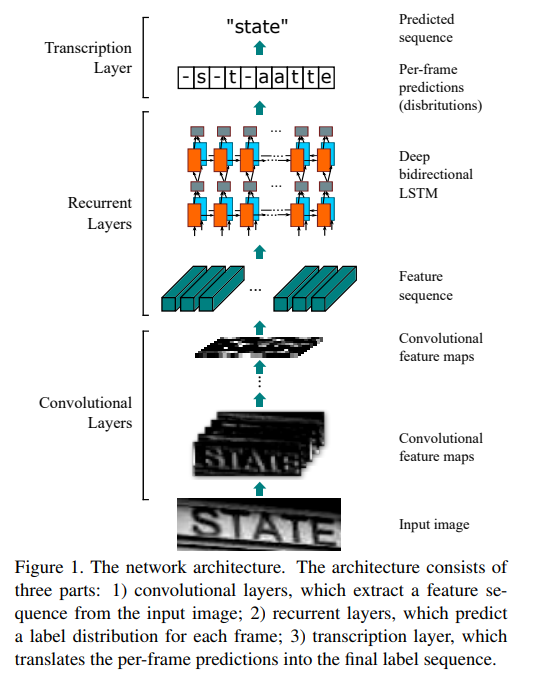
CRNN은 CNN과 RNN을 섞은 모델로 이미지를 입력으로 받아 특징을 추출하고,
추출한 특징을 바탕으로 RNN을 통해 시퀀스별 글자를 예측하는 모델을 말한다.
최근 OCR을 공부하고 있는데 이미지로부터 어떻게 해석을 하는지 궁금해 코드부터 뜯어보았다.
첫번째로 참고한 모델은 완전 기초적인 CRNN 모델로 코드와 참조한 링크는 다음과 같다.
https://github.com/qjadud1994/CRNN-Keras/blob/master/Model.py
GitHub - qjadud1994/CRNN-Keras: CRNN (CNN+RNN) for OCR using Keras / License Plate Recognition
CRNN (CNN+RNN) for OCR using Keras / License Plate Recognition - GitHub - qjadud1994/CRNN-Keras: CRNN (CNN+RNN) for OCR using Keras / License Plate Recognition
github.com
윗 부분의 CNN Layer는 흔히 봤던 모델과 매우 유사하였고,
비전 분야를 주로 공부했던 나에게는 이해하기 어렵진 않은 부분으로
이미지의 공간적 정보를 유지해나가면서 특징을 뽑아내는 것을 볼 수 있었다.
    # Convolution layer (VGG)
    inner = Conv2D(64, (3, 3), padding='same', name='conv1', kernel_initializer='he_normal')(inputs)  # (None, 128, 64, 64)
    inner = BatchNormalization()(inner)
    inner = Activation('relu')(inner)
    inner = MaxPooling2D(pool_size=(2, 2), name='max1')(inner)  # (None,64, 32, 64)

    inner = Conv2D(128, (3, 3), padding='same', name='conv2', kernel_initializer='he_normal')(inner)  # (None, 64, 32, 128)
    inner = BatchNormalization()(inner)
    inner = Activation('relu')(inner)
    inner = MaxPooling2D(pool_size=(2, 2), name='max2')(inner)  # (None, 32, 16, 128)

    inner = Conv2D(256, (3, 3), padding='same', name='conv3', kernel_initializer='he_normal')(inner)  # (None, 32, 16, 256)
    inner = BatchNormalization()(inner)
    inner = Activation('relu')(inner)
    inner = Conv2D(256, (3, 3), padding='same', name='conv4', kernel_initializer='he_normal')(inner)  # (None, 32, 16, 256)
    inner = BatchNormalization()(inner)
    inner = Activation('relu')(inner)
    inner = MaxPooling2D(pool_size=(1, 2), name='max3')(inner)  # (None, 32, 8, 256)

    inner = Conv2D(512, (3, 3), padding='same', name='conv5', kernel_initializer='he_normal')(inner)  # (None, 32, 8, 512)
    inner = BatchNormalization()(inner)
    inner = Activation('relu')(inner)
    inner = Conv2D(512, (3, 3), padding='same', name='conv6')(inner)  # (None, 32, 8, 512)
    inner = BatchNormalization()(inner)
    inner = Activation('relu')(inner)
    inner = MaxPooling2D(pool_size=(1, 2), name='max4')(inner)  # (None, 32, 4, 512)

    inner = Conv2D(512, (2, 2), padding='same', kernel_initializer='he_normal', name='con7')(inner)  # (None, 32, 4, 512)
    inner = BatchNormalization()(inner)
    inner = Activation('relu')(inner)

    # CNN to RNN
    inner = Reshape(target_shape=((32, 2048)), name='reshape')(inner)  # (None, 32, 2048)
    inner = Dense(64, activation='relu', kernel_initializer='he_normal', name='dense1')(inner)  # (None, 32, 64)

    # RNN layer
    lstm_1 = LSTM(256, return_sequences=True, kernel_initializer='he_normal', name='lstm1')(inner)  # (None, 32, 512)
    lstm_1b = LSTM(256, return_sequences=True, go_backwards=True, kernel_initializer='he_normal', name='lstm1_b')(inner)
    reversed_lstm_1b = Lambda(lambda inputTensor: K.reverse(inputTensor, axes=1)) (lstm_1b)

    lstm1_merged = add([lstm_1, reversed_lstm_1b])  # (None, 32, 512)
    lstm1_merged = BatchNormalization()(lstm1_merged)

    lstm_2 = LSTM(256, return_sequences=True, kernel_initializer='he_normal', name='lstm2')(lstm1_merged)
    lstm_2b = LSTM(256, return_sequences=True, go_backwards=True, kernel_initializer='he_normal', name='lstm2_b')(lstm1_merged)
    reversed_lstm_2b= Lambda(lambda inputTensor: K.reverse(inputTensor, axes=1)) (lstm_2b)

    lstm2_merged = concatenate([lstm_2, reversed_lstm_2b])  # (None, 32, 1024)
    lstm2_merged = BatchNormalization()(lstm2_merged)

    # transforms RNN output to character activations:
    inner = Dense(num_classes, kernel_initializer='he_normal',name='dense2')(lstm2_merged) #(None, 32, 63)
    y_pred = Activation('softmax', name='softmax')(inner)

    labels = Input(name='the_labels', shape=[max_text_len], dtype='float32') # (None ,8)
    input_length = Input(name='input_length', shape=[1], dtype='int64')     # (None, 1)
    label_length = Input(name='label_length', shape=[1], dtype='int64')     # (None, 1)
위의 코드를 기준으로 보면 CNN의 결과로
B x W x H x C (batch x 32(width) x 4(height) x 512(channel)) 의 특징이 추출된 것을 볼 순 있었는데,
그럼 CNN의 특징이 어떻게 RNN으로 들어갔을까??
먼저 reshape를 통해 width 특징은 유지한 채 RNN의 채널 개수는 width * channel 개수로 만들었다.
이 때, CNN의 height 부분의 공간적 특징들이 섞이는 것을 확인 할 수 있었다.
CNN output : B x W x H X C -> RNN_input : B x W x C_new1(= H x C)
    inner = Conv2D(512, (2, 2), padding='same', kernel_initializer='he_normal', name='con7')(inner)  # (None, 32, 4, 512)
    inner = BatchNormalization()(inner)
    inner = Activation('relu')(inner)

    # CNN to RNN
    inner = Reshape(target_shape=((32, 2048)), name='reshape')(inner)  # (None, 32, 2048)
    inner = Dense(64, activation='relu', kernel_initializer='he_normal', name='dense1')(inner)  # (None, 32, 64)
그 다음 FC layer로 B x W x C_new2 로 채널 개수를 변경하면서 layer 개수를 줄여주는 걸 볼 수 있었는데,
내 생각엔 채널 개수를 줄이기 위해 진행한 것 같다.
# CNN to RNN
    inner = Reshape(target_shape=((32, 2048)), name='reshape')(inner)  # (None, 32, 2048)
    inner = Dense(64, activation='relu', kernel_initializer='he_normal', name='dense1')(inner)  # (None, 32, 64)
위의 과정까지를 정리하면 이런 형태일 것 같다.

이후 RNN에 들어갈 땐
lstm_1, lstm_1b 채널에 각각 진행한 뒤, lstm_merged를 통해 채널이 합쳐지는 것을 보아
input을 2개의 레이어에 각각 진행했다가 합치는 작업으로 보였고, 2번 반복한 것을 볼 수 있었다.
    # RNN layer
    lstm_1 = LSTM(256, return_sequences=True, kernel_initializer='he_normal', name='lstm1')(inner)  # (None, 32, 512)
    lstm_1b = LSTM(256, return_sequences=True, go_backwards=True, kernel_initializer='he_normal', name='lstm1_b')(inner)
    reversed_lstm_1b = Lambda(lambda inputTensor: K.reverse(inputTensor, axes=1)) (lstm_1b)

    lstm1_merged = add([lstm_1, reversed_lstm_1b])  # (None, 32, 512)
    lstm1_merged = BatchNormalization()(lstm1_merged)

    lstm_2 = LSTM(256, return_sequences=True, kernel_initializer='he_normal', name='lstm2')(lstm1_merged)
    lstm_2b = LSTM(256, return_sequences=True, go_backwards=True, kernel_initializer='he_normal', name='lstm2_b')(lstm1_merged)
    reversed_lstm_2b= Lambda(lambda inputTensor: K.reverse(inputTensor, axes=1)) (lstm_2b)

    lstm2_merged = concatenate([lstm_2, reversed_lstm_2b])  # (None, 32, 1024)
    lstm2_merged = BatchNormalization()(lstm2_merged)

    # transforms RNN output to character activations:
    inner = Dense(num_classes, kernel_initializer='he_normal',name='dense2')(lstm2_merged) #(None, 32, 63)
    y_pred = Activation('softmax', name='softmax')(inner)

    labels = Input(name='the_labels', shape=[max_text_len], dtype='float32') # (None ,8)
    input_length = Input(name='input_length', shape=[1], dtype='int64')     # (None, 1)
    label_length = Input(name='label_length', shape=[1], dtype='int64')     # (None, 1)
마지막으로는 클래스 개수로 FC layer를 진행해 각 width마다 어떤 클래스인지 맞추는 작업이 들어가고
CTC loss를 이용해 각 위치에서 예측한 글자가 맞는지 확인하는 것을 볼 수 있었다.
그리고 다른 코드도 이렇게 진행하는지 궁금하여 네이버 clova ai에서 진행한 코드도 뜯어보았다.
https://github.com/clovaai/deep-text-recognition-benchmark/blob/master/modules/feature_extraction.py
GitHub - clovaai/deep-text-recognition-benchmark: Text recognition (optical character recognition) with deep learning methods.
Text recognition (optical character recognition) with deep learning methods. - GitHub - clovaai/deep-text-recognition-benchmark: Text recognition (optical character recognition) with deep learning ...
github.com
RCNN 코드 부분을 확인해보니 아래의 코드가 있었다.
class RCNN_FeatureExtractor(nn.Module):
    """ FeatureExtractor of GRCNN (https://papers.nips.cc/paper/6637-gated-recurrent-convolution-neural-network-for-ocr.pdf) """

    def __init__(self, input_channel, output_channel=512):
        super(RCNN_FeatureExtractor, self).__init__()
        self.output_channel = [int(output_channel / 8), int(output_channel / 4),
                               int(output_channel / 2), output_channel]  # [64, 128, 256, 512]
        self.ConvNet = nn.Sequential(
            nn.Conv2d(input_channel, self.output_channel[0], 3, 1, 1), nn.ReLU(True),
            nn.MaxPool2d(2, 2),  # 64 x 16 x 50
            GRCL(self.output_channel[0], self.output_channel[0], num_iteration=5, kernel_size=3, pad=1),
            nn.MaxPool2d(2, 2),  # 64 x 8 x 25
            GRCL(self.output_channel[0], self.output_channel[1], num_iteration=5, kernel_size=3, pad=1),
            nn.MaxPool2d(2, (2, 1), (0, 1)),  # 128 x 4 x 26
            GRCL(self.output_channel[1], self.output_channel[2], num_iteration=5, kernel_size=3, pad=1),
            nn.MaxPool2d(2, (2, 1), (0, 1)),  # 256 x 2 x 27
            nn.Conv2d(self.output_channel[2], self.output_channel[3], 2, 1, 0, bias=False),
            nn.BatchNorm2d(self.output_channel[3]), nn.ReLU(True))  # 512 x 1 x 26

    def forward(self, input):
        return self.ConvNet(input)
자세히 살펴보면 output_channel은 레이어 중간 결과 채널 수를 설정한 것이란 걸 볼 수 있다.
위의 RCNN FeatureExtractor를 다시 보면 CNN과 RNN을 번갈아 진행하는 구조로 특징을 추출하는 구조임을 알 수 있었고, 초기 모델인 CRNN에 비해 연구가 진행되면서 CNN과 RNN을 번갈아가면서 진행해 특징을 추출하는 게 성능이 더 좋은것으로 보였다.
여기선 GRCL이라는 구조를 두었는데 GRCL은 Gated RCNN에 대한 내용으로 보이고, 코드도 아래에 적혀있었다.
# For Gated RCNN
class GRCL(nn.Module):

    def __init__(self, input_channel, output_channel, num_iteration, kernel_size, pad):
        super(GRCL, self).__init__()
        self.wgf_u = nn.Conv2d(input_channel, output_channel, 1, 1, 0, bias=False)
        self.wgr_x = nn.Conv2d(output_channel, output_channel, 1, 1, 0, bias=False)
        self.wf_u = nn.Conv2d(input_channel, output_channel, kernel_size, 1, pad, bias=False)
        self.wr_x = nn.Conv2d(output_channel, output_channel, kernel_size, 1, pad, bias=False)

        self.BN_x_init = nn.BatchNorm2d(output_channel)

        self.num_iteration = num_iteration
        self.GRCL = [GRCL_unit(output_channel) for _ in range(num_iteration)]
        self.GRCL = nn.Sequential(*self.GRCL)

    def forward(self, input):
        """ The input of GRCL is consistant over time t, which is denoted by u(0)
        thus wgf_u / wf_u is also consistant over time t.
        """
        wgf_u = self.wgf_u(input)
        wf_u = self.wf_u(input)
        x = F.relu(self.BN_x_init(wf_u))

        for i in range(self.num_iteration):
            x = self.GRCL[i](wgf_u, self.wgr_x(x), wf_u, self.wr_x(x))

        return x
CTC Loss
위에서의 첫 번째 코드를 기준으로 한다면 32개의 채널을 가지고 "abcdefg"를 인식시킨다고 하면
위에서 나온 글자가 어떻게 매핑되는지도 궁금해졌고, CTC Loss란걸 알게 되었다.
CTC란 Connectionist temporal classification 의 약자로
자세한 설명은 아래의 블로그에서 더 자세히 설명되어 있는 걸 보고 공부했다.
https://ratsgo.github.io/speechbook/docs/neuralam/ctc
Connectionist Temporal Classification
articles about speech recognition
ratsgo.github.io
내가 알고 싶었던 부분을 말하면 CTC loss는 순차적으로 진행하면서 이전 state와 중복되면 합쳐진다는 것이다.
그렇기 때문에 "aaaaaabbbbccddeefff" 같은 출력이 나오면 abcdef로 요약될 수 있었다.
요약하면 CRNN은 입력 이미지를 CNN에 통과시킨 후, width 채널을 유지한 채로 RNN을 진행해
순서대로 각 width 별로 글자를 인식시키고, 그 결과를 정리해 보여주는 모델이란 걸 이해할 수 있었다.
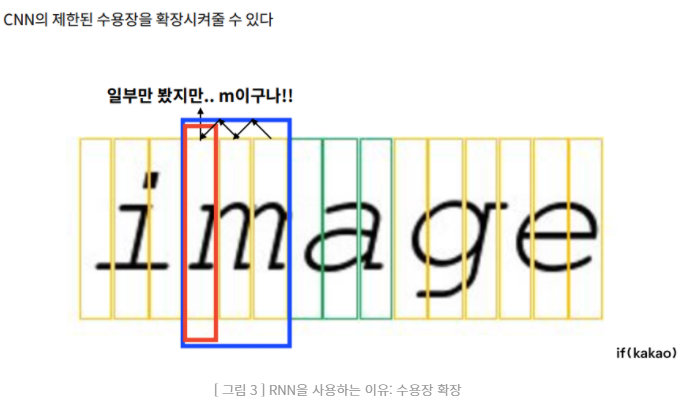
개인적인 궁금증으로 width를 더 많이 세분화시킬수록 CRNN에서 글자를 놓치지 않을 것 같단 생각이 들지만,
이렇게 진행하면 음절 안에서도 더 짜르는 경우도 생기는 trade-off가 있을 것 같다.